Lighting Your Disney Figure Display for Maximum Impact

This guide covers the specific techniques, equipment, and placement strategies required to light your Disney figure displays for better visibility and visual depth. You'll learn how to select the right light temperature, avoid damaging delicate plastics, and use different types of LEDs to highlight specific details on your collectibles.
What is the Best Type of Light for Disney Figures?
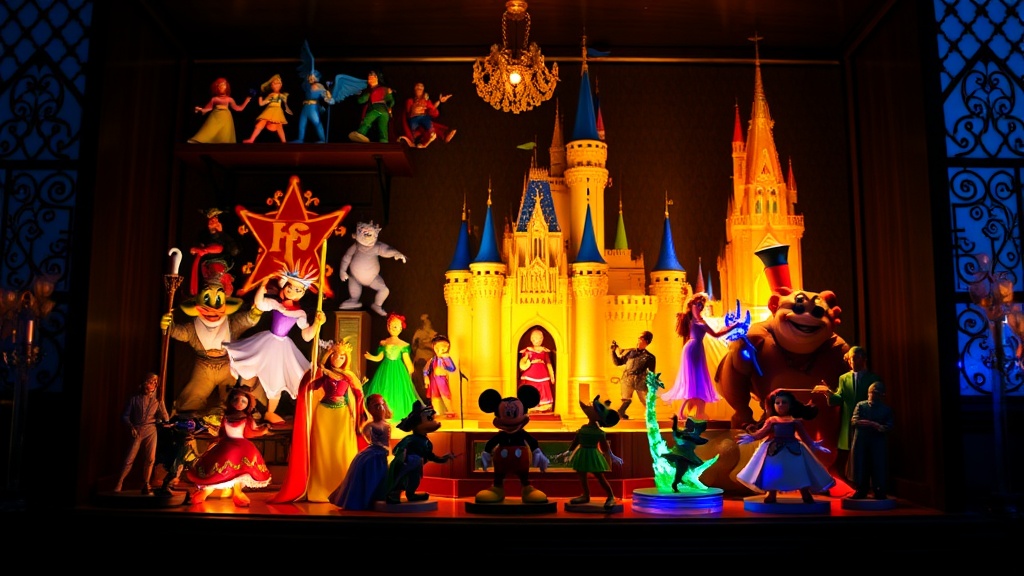
LED lighting is the best option for Disney figure displays because it produces minimal heat and offers high color accuracy. Most high-end collectors prefer way to use LED strips or small spotlights to avoid the heat damage associated with traditional incandescent bulbs.
If you're displaying a vintage 1990s Disney figure, you have to be careful. Heat from old-school bulbs can actually soften the plastic or cause paint to peel over time. LEDs stay cool to the touch, which makes them much safer for your investment. (I've seen more than one shelf ruined by a cheap halogen bulb that sat too close to a delicate piece.)
When choosing your gear, look for "High CRI" (Color Rendering Index) lights. A high CRI means the light shows colors closer to how they look in natural sunlight. This is a big deal when you're trying to show off the vibrant reds of a Mickey Mouse outfit or the shimmering gold of a Disney Princess gown. If the CRI is low, your figures might end up looking dull or slightly "off" in color.
Here are a few common lighting options for collectors:
- LED Strips: Great for long shelves or the underside of glass cabinets.
- Puck Lights: Perfect for creating a "spotlight" effect on a single hero piece.
- Micro-LED Fairy Lights: Good for a whimsical, magical look in a diorama.
- Clamp-on Spotlights: Useful if you're displaying figures on a desk or open shelving.
Don't forget about the power source. If you're using battery-operated lights, you'll be changing batteries constantly. I always suggest looking for USB-powered or plug-in options for a permanent display setup. It's much less hassle in the long run.
How Do I Avoid Damaging My Collection with Light?
To avoid damage, you must prioritize low-heat light sources and avoid direct, unfiltered sunlight.
UV rays are the silent enemy of any serious collector. Sunlight can cause "sun bleaching," where the vibrant colors of your Disney figures fade into a pale, washed-out version of themselves. This isn't just a cosmetic issue—it can actually degrade the structural integrity of certain plastics. If your display is near a window, you'll want to use UV-filtering film on the glass or move the shelf to a darker corner.
It's also worth noting that light isn't just about color; it's about heat. Even if a light doesn't look "hot," it can raise the ambient temperature inside a glass cabinet. This can lead to the "sticky figure" phenomenon, where the plastic begins to break down or feel tacky to the touch. This is a common issue with certain older vinyl figures. Light damage is often permanent and can't be fixed once it happens.
If you're worried about the longevity of your display, you might want to check out my previous post on how to dust-proof your Disney figurine collection. Dust and light often go hand-in-hand in a display environment. A clean, controlled environment is always better for the long-term health of your pieces.
How Much Light Should I Use for Maximum Impact?
You should use a combination of ambient and accent lighting to create depth without washing out the details.
Most people make the mistake of just turning on one big light and calling it a day. That results in a flat, boring look. You want layers. Think of it like a movie set. You have your general light, and then you have your "hero" lights.
A good rule of thumb is to have a soft, low-level light for the whole shelf, and then one or two bright spots for your most prized pieces. This creates shadows, and shadows are what give your figures a sense of three-dimensional weight. Without shadows, your figures will look like they're just "pasted" onto the shelf.
| Style | Best For | Visual Effect | Complexity |
|---|---|---|---|
| Ambient Only | General Shelving | Flat, even, safe | Very Low |
| Spotlighting | Single Hero Figures | Dramatic, high-contrast | Medium |
| Backlighting | Silhouettes/Glass | Glow, depth, magic | High |
| Layered (Mix) | Full Collections | Professional, museum-quality | High |
The catch? Layered lighting takes more time to set up. You'll need to hide your wires and manage your power sources carefully. If your wires are messy, it ruins the "magic" of the display. You can use smart ways to organize your shelves to hide those cables behind the figures or the back panel of the cabinet.
Where Should I Place Lights for Best Results?
Placement depends on whether you want to highlight the front of the figure or the overall scene.
If you're using LED strips, don't place them directly in front of the figure. If the light hits the figure's face directly, it will look like a camera flash went off—it's harsh and unflattering. Instead, place the light slightly above and behind the figure, or off to the side. This creates a "rim light" effect that makes the silhouette pop.
For deeper cabinets, placing lights at the top can be tricky because the top shelf often casts a shadow on the ones below. In these cases, I recommend using vertical LED strips on the sides of the cabinet. This ensures the light travels down the entire height of the display rather than just hitting the top layer. It's a much more effective way to ensure your bottom-shelf figures aren't sitting in the dark.
If you have a large collection of, say, Disney's 90s era toys, you might want to vary the light color slightly. Maybe a warmer light for a cozy scene, or a cooler light for a space-themed display. Just don't overdo it. If every single light is a different color, it'll look like a disco rather than a curated collection.
One thing to watch out for is glare. If you have a glass cabinet, the light might reflect off the glass and right into your eyes. This is incredibly annoying when you're trying to admire your collection. To fix this, try angling your lights so they aren't pointing directly at the glass, or use matte-finish light covers to diffuse the beam.
The goal is to make the light work for you, not against you. A well-lit display should look like a part of the room, not a bright, distracting eyesore. Take your time with the positioning. It's often a process of trial and error—moving a light an inch to the left, checking the reflection, and then adjusting again. It's worth the effort.
Steps
- 1
Choose LED over Incandescent to Prevent Heat Damage
- 2
Position Backlighting to Create Depth and Silhouettes
- 3
Use Spotlights to Highlight Fine Sculpted Details
- 4
Check for Glare on Plastic Surfaces Before Finalizing Setup